Secondly, remove the bad pixel on the LED module.
The first thing I need to do is power off the LED module. First, take off the power cable, second, take off the ribbon cable (Please remember to follow this order) before removing the sick little one. Now, I am going to take off his jacket (mask) in that area, only need to remove single one jacket(mask).
For
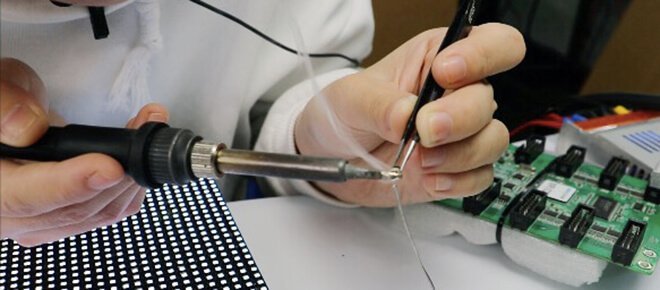
outdoor LED module, we need to use the tweezer to remove the surface black glue. After removed the black glue, blow the dead pixel with the air gun
(NOTE: set the wind temperature and wind speed as level 2, in case of hurt the PCB board.) And when you use the air gun, please hand it stand upright 90 degrees, otherwise will easy to hurt the neighborhood.
When the bad pixel on the LED module is loosing, please gently shake the dead LED like a banana with the tweezer, wait the original tin on the PCB board melt into a liquid like a water, then the dead LED will be easy to take out. Please remember, do not use brute force to move the dead LED, this will hurt the PCB board.


20 Responses
Hola me gustaría inf paneles Led y contrladored
Gracias por tu comentario, Loki responderá tu correo electrónico en una hora, su correo electrónico es loki@bibiled.com
Hello
I Am interesting in Reparing for led screen can you send me Video how to Reparing led modules I have some modules like P6 4.8 and 3.9 outdoor
Thanks
Avdhesh A Rathod
Thank you, Avdhesh. Already asked Miss.Loki sent you the email, please check.
Hi, Did miss Loki has more tips to repair indoor and outdoor led screens?
Thanx, Jos
Hi Dear Jos, thanks for your attention, Miss Loki will start the update the tips in next month. Do you have any confusion about how to repair the LED screen?
What is the brand of the black glue your company uses?
We have similar modules that requires black glue but we don’t know which one to get.
The black color electronic seal glue, you should find it in the electronic market in your country. And you could send the broke led modules to us, and we could repair for you.
Hi,
I would want to know your sizes, picture resolution, prices and shipment of your LED screens to Lagos Nigeria.
Thanks
Stephen
Hi, our sales manager will contact you now, thank you
black glue for the module
what type of glue do you use for the module
+27828998999
Nicole will contact you soon
What kind of Solder Iron recommend to Solder 2.5mm pixels?
We recommend the hot air gun for the PH2.5mm LED screen repair
Can you send me the Name of Glue?
black glue for the module
what type of glue do you use for the module.
Can you tell me a specific brand and model? as an example
Hello, could you please recommend a place that sells/ships to Europe replacement/spare pixels for indoor LED module (SMD2020 black, RGB, pixel pitch 2.8mm)?
We need them urgently but the technical support of the company that sold the modules does not respond.
Thank you in advance.
I need to know how to repair GZlIC modules for my self please tell me the process inside led there 192.192 panels
I need to know how to repair GZlIC modules for my self please tell me the process inside led there 192.192 panels very small pixels
I need to know how to repair GZlIC modules for my self please tell me the process inside led there 192.192 panels very small pixels