

As an important tool for modern information dissemination, LED display screens are widely used on various occasions, such as commercial advertising, conference displays, sports events, etc.
In order to ensure the quality and performance of the display screen, the quality inspection link is crucial. This article will delve into the six key tests in the LED display quality inspection process: aging test, lighting test, single color test, brightness test, flatness test, and detail inspection.

The lighting test is a basic test to check whether the LED display can display normally. Through the lighting test, you can confirm whether each pixel of the display screen can work normally and whether there are any problems, such as lack of color or non-lighting.
Failure to perform a lighting test will cause the display to display abnormally during use, affecting the accurate transmission of information. Conducting lighting tests can detect problems in time and improve product quality.
Test steps:
Adjust the LED display to normal working condition.
Send all-white, all-black, and other basic color images to the display screen through the control card or related equipment.
Observe the display status of each pixel on the display screen to ensure that each pixel can be lit normally and there are no problems such as lack of color or non-lighting.
Record and analyze test results and repair or replace unqualified pixels.
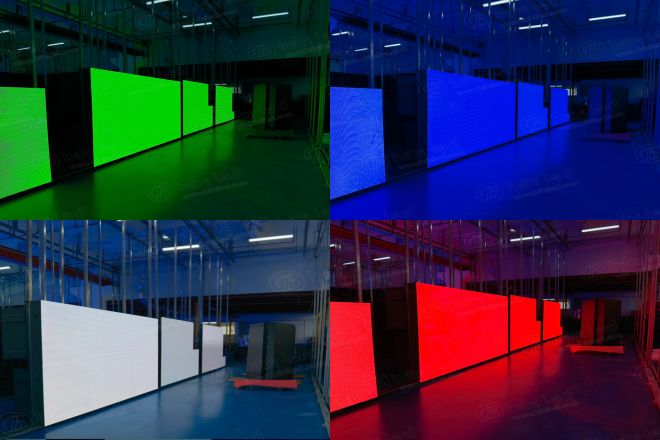
The single-color test is a test for pixels of a single color in the LED display, mainly checking the color consistency and accuracy. Through the monochrome test, you can ensure the quality of the display when displaying monochrome images and improve the viewing effect.
Failure to perform a monochrome test may cause color distortion when the display displays a monochrome image, affecting the visual effect. Conducting monochrome testing can improve the color expression of the display and meet users’ needs for high-quality images.
Test steps:
Adjust the LED display to normal working condition.
Send a single-color picture to the display through the control card or related equipment.
Use a color measurement instrument to measure and record the color of your display.
Analyze the measurement results to evaluate the display’s color consistency and accuracy when displaying in monochrome.
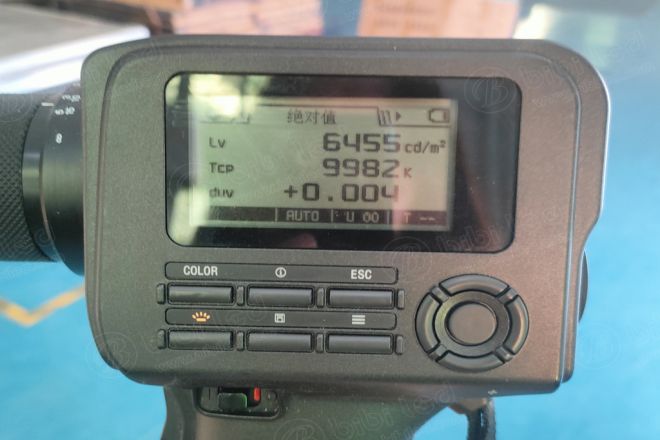
Brightness test is an important part of LED display quality inspection, aiming to detect the brightness performance of the display in different environments. Through the brightness test, the visibility of the display under different light conditions can be evaluated to ensure that it can provide clear visual effects in various environments.
Failure to do a brightness test may cause the display to fail to display properly in environments with strong or weak light, affecting the transmission of information. Conducting brightness tests can improve the adaptability of the display in different environments and meet users’ viewing needs in different scenarios.
Test steps:
Adjust the LED display to normal working condition.
Use a luminance meter to measure and record the brightness of various areas of the display.
Analyze the measurement results to evaluate the brightness performance of the display under different lighting conditions.
Adjust the brightness parameters of the display screen based on the test results to improve its visibility under various light conditions.
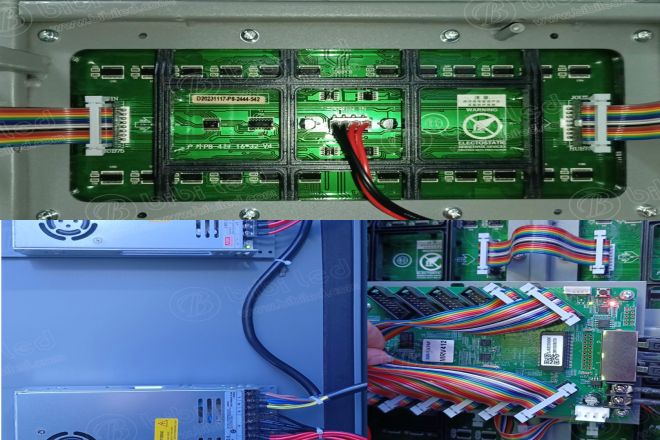
Detailed inspection is a detailed inspection of all aspects of the LED display, including solder joints, wires, box structure, etc. Through detailed inspection, potential workmanship problems and appearance defects can be discovered, improving the overall quality of the product.
Failure to perform detailed inspections may cause various problems in the display during use, such as solder joints falling off, wire damage, etc., affecting stability. Conducting detailed inspections can improve product reliability and durability and reduce subsequent maintenance costs.
Test steps:
Conduct a comprehensive inspection of the appearance of the LED display to observe whether there are scratches or unevenness.
Check the solder joints, wires, and other details of the display to make sure there are no problems, such as poor welding or damaged wires.
Check the display box structure to ensure it is strong and stable.
Repair or replace found problems to improve product reliability and durability.

One Response
Hola buenas tardes me pueden ayudar con dándome indicaciones para reparar una pantalla p3.91-64×64-16s-v3.1