

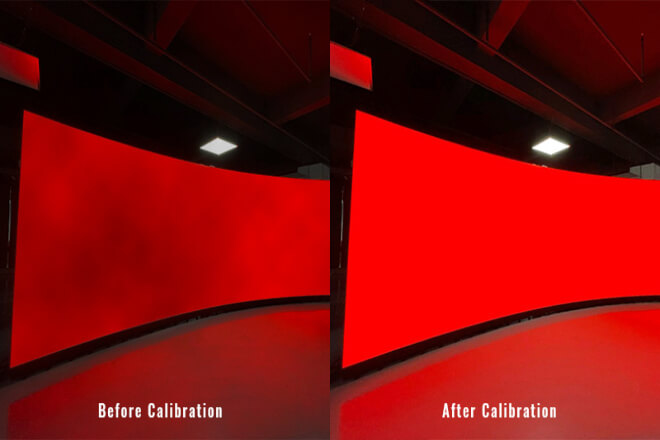
Have you noticed that some LEDディスプレイ show exceptionally clear and natural images, while others suffer from uneven 輝度, color distortion.
Or even unpleasant visual effects at the splicing points? This is closely related to whether the screen has been properly calibrated.
Calibration isn’t just for professional engineers; even users with no prior experience can use simple methods to achieve ideal brightness, color, contrast, and splicing effects.
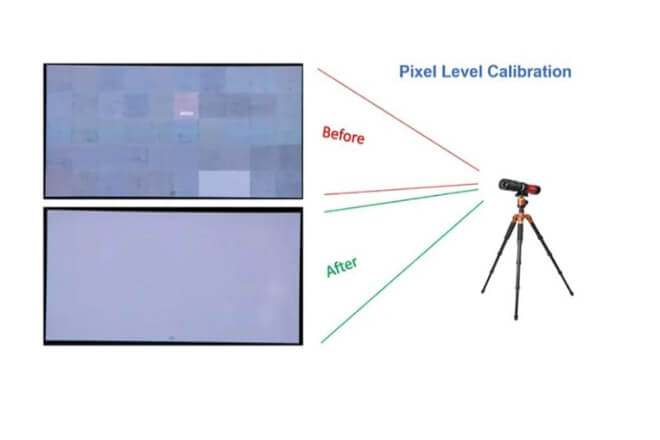
LED display “calibration” refers to: using professional equipment to collect the brightness and color data of each LED on the screen, and then using software to adjust these differences to a standard range.
Because LEDs themselves have slight manufacturing variations, coupled with transportation, installation, environmental influences.
And gradual attenuation during use, inconsistent brightness, color deviations, or uneven grayscale often occur between different areas.
The purpose of calibration is to bring all LEDs back to a “level playing field.”
Calibration primarily addresses three issues: 輝度 consistency, color accuracy, and overall image uniformity.
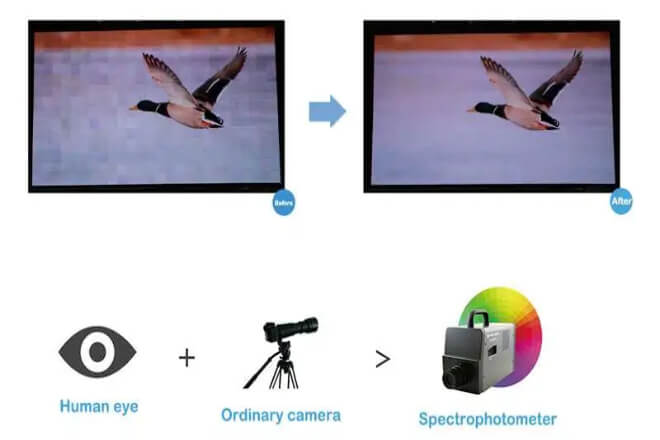
A calibrated screen will not have a blue or red cast in white, dark areas will not flicker, and bright areas will not be glaring.
The entire screen will look like a natural, complete image, rather than a “puzzle” pieced together from multiple modules.
From a user experience perspective, calibration makes the image more realistic, details cleaner, and colors more stable, resulting in a more comfortable viewing experience.
It’s also crucial for screens used over a long period—as time goes on, the LEDs degrade unevenly, and without calibration, color differences will become increasingly noticeable.
Regular calibration ensures the screen maintains a consistent visual performance, reducing maintenance costs due to image quality degradation later on.
For high-definition scenarios such as commercial displays, 展示会, ステージ effects, or command centers, calibration is almost indispensable.

LED display calibration is not just about “輝度 and color adjustment,” but a key step in ensuring the screen consistently displays high-quality images.
The main purpose of calibration is to ensure accurate color and consistent brightness, resulting in a uniform and natural overall image.
Whether in white, dark areas, or bright areas, the screen should display the necessary details and levels.
In short, calibration makes the screen look “more realistic and comfortable,” and the displayed content more professional.
So, when is calibration needed?
- Initial installation:
When a new screen is first assembled, slight differences are inevitable between modules. Calibration at this time allows the entire screen to quickly reach a uniform standard.
- Long-term use:
Over time, LED beads gradually degrade, and different areas degrade at different rates. If not recalibrated, the screen is prone to uneven brightness and increased color differences.
- Special scenario requirements:
For example, in high-end 展示会, ステージ performances, or command centers, where precise image and consistent brightness are required, temporary special calibration may be necessary.
At the same time, many people make several common mistakes during calibration:
Adjusting only brightness, not color: Brightness may be uniform, but color deviation remains, and the image is still not natural.
Assuming one calibration is effective for life, LED screens will still degrade over long-term use and require periodic recalibration.
Using unsuitable calibration tools or methods: Low-precision equipment or incorrect software settings may cause calibration failure or even introduce new color differences.
The key to avoiding common pitfalls is to use professional calibration tools, combining brightness and color adjustments, and developing a regular calibration plan based on screen usage.
This is the only way to truly unleash the display potential of an LED screen and maintain consistently high image quality.
For users with no prior experience, color calibration for LED displays is not an unattainable task.
Its core goal is to ensure uniform and natural screen colors and consistent brightness, avoiding color casts or uneven brightness in certain areas.
Even without professional equipment, it can be accomplished using the screen’s built-in functions and some simple methods.
1) Understanding Basic Principles
Each LED chip in an LED screen may have slight differences in brightness and color, which can cause color patches or unevenness across the entire screen.
Calibration involves adjusting parameters such as brightness, contrast, and color temperature to make the display as consistent as possible across the entire screen.
For users with no prior experience, simply observing and making simple adjustments with the naked eye can significantly improve the display effect.
2) Preparation
Controller/Remote Control: Most LED screens have a controller or remote control function, allowing adjustment of brightness, contrast, color temperature, etc.
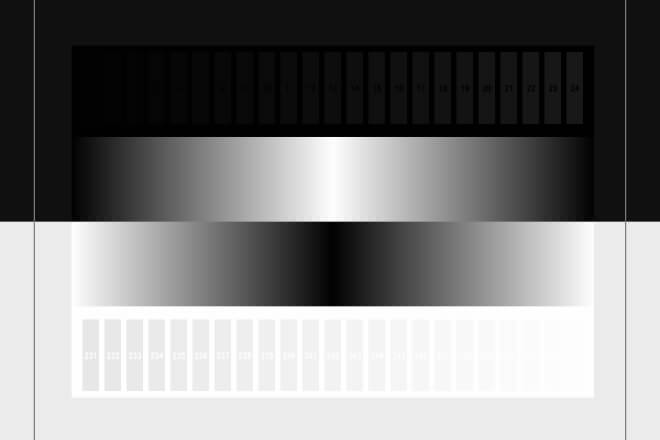
Test Chart or Video: Pure white, pure gray, color gradient charts, or standard calibration videos can be displayed on the screen.
Good Observation Environment: Avoid strong sunlight or direct light shining on the screen to prevent interference with judgment.
3) Calibration Steps
Step 1: Unify 輝度
Display a pure white or light gray test chart on the screen.
Observe whether there are obvious brightness differences across the entire screen.
Adjust the brightness using the controller to make the visual appearance of the screen as uniform as possible.
Step 2: Adjust Color Temperature
Display a white or gray test chart.
A color temperature that is too cool will appear bluish, and one that is too warm will appear yellowish.
Adjust the color temperature using the screen settings until white looks natural and without a color cast.
Step 3: Check Color Display
Play a color gradient chart or color test video.
Note whether the red, green, and blue blocks are uniform and whether there are any obvious deviations.
If some modules have color deviations, fine-tuning can be done in the controller.
Step 4: Fine-tuning by Region
If the screen is composed of multiple modules and individual modules show significant deviations, slight brightness or color adjustments can be made to individual modules via the controller.
The goal is not to be precise down to each individual LED, but rather to achieve overall visual balance.
Step 5: Verification and Repetition
After completing one calibration, display different content (text, images, videos) to check the effect.
For screens used for extended periods, this process can be repeated every few months to ensure consistent image stability.
The brightness and contrast of an LED display directly affect the viewing experience: excessively high or low brightness will make the image uncomfortable, while inappropriate contrast will result in loss of detail or flattened colors.
Even without professional expertise, you can achieve optimal screen display through simple operations.
1) The Impact of Brightness and Contrast on Display Quality
Determines the brightness and darkness of the screen image. Excessive brightness can be glaring, especially in indoor scenes.
Insufficient brightness will make the image appear dim and lack detail.
- 対比:
Determines the sense of depth and variation in brightness and darkness of the image.
Low contrast makes the image appear flat and lacking in depth; high contrast can cause loss of detail in dark areas or blown-out highlights.
Correct brightness and contrast settings ensure natural colors, clear text, and distinct details in images and videos.
2) How to Adjust Based on Ambient Light Conditions and Application Scenarios
2.1) Observing Ambient Light
Indoor soft light: Moderate brightness is sufficient; avoid setting it too bright.
Outdoor direct sunlight: Increase brightness to ensure clear visibility of content.
Evening or dark environments:Reduce brightness appropriately to avoid glare and protect screen lifespan.
2.2) Selecting Contrast
Primarily displaying text content:Slightly increase contrast to make text edges clearer.
Displaying images or videos:Maintain medium contrast for natural image depth and to avoid loss of detail in dark areas.
2.3) Operation Steps
Display pure white, pure black, gray gradients, or test images on the screen.
First, adjust the brightness to ensure the pure white area is uniform and not glaring.
Adjust the contrast to make the black areas sufficiently deep without losing detail.
Observe the display area by area. If a brightness or contrast deviation is found in a particular module, make individual fine adjustments.
3) Automatic Brightness Adjustment Technology and Applications
Many modern LED displays support automatic brightness adjustment: LED screens have built-in light sensors that automatically adjust brightness based on ambient light intensity.
Brightness is automatically increased in bright sunlight and automatically decreased at night or in low indoor light.
For users with no experience, this is the most convenient method, ensuring the screen is always within a comfortable brightness range without frequent manual adjustments.
LED displays are often not a single piece of screen, but rather composed of multiple modules spliced together.
During the splicing process, if the position of each module is not precise, it is easy to cause image skew, distorted text or patterns.
It can even make straight lines appear curved, which is what we commonly call image distortion.
The purpose of dimension and alignment calibration is to eliminate these problems, making the screen appear as a single piece, with a natural image and virtually invisible seams.
1) Why is dimension calibration important?
Imagine this: an advertisement playing on a large screen in a shopping mall.
If the text at the seams is stretched or the background lines are warped, viewers will immediately perceive it as “unprofessional.”
Similarly, on a stage or 展示 hall screen, if the image is distorted, it not only affects aesthetics but may also reduce readability and the viewing experience.
Dimensional calibration ensures precise alignment of the edges, spacing, and angles of each module, guaranteeing correct aspect ratios and overall visual comfort after splicing.
2) Alignment Methods for Beginners
- Use Reference Lines for Basic Positioning
Draw horizontal and vertical reference lines on the mounting bracket using a level or laser level.
Align each module with the reference lines to ensure the overall position doesn’t shift.
- Check Accuracy by Displaying a Test Graph
Play a grid or straight-line graph to check the continuity of horizontal and vertical lines.
If lines are found to be broken or curved at the seams, the position of the corresponding module needs fine-tuning.
- Module Fine-Tuning Techniques
The best adjustment order is horizontal first, then vertical, and finally overall fine-tuning.
When fine-tuning, avoid excessive force; gently push the module. Maintain moderate seams.
Too tight a seam may compress the modules, while too loose a seam will result in noticeable gaps.
3) Tips for a More Natural Splicing
- Multiple Checks:
After installation, check the seams periodically, especially for large screens, as thermal expansion and contraction or vibration can cause slight misalignment of modules.
- Visual Priority:
Even without measuring instruments, visually observe the continuity of straight lines, patterns, and text, adjusting until it looks “comfortable.”
- Patient Fine-Tuning:
Small adjustments are easier to unify the entire screen than large adjustments, while avoiding damage to the modules.